Treasure Chest
Treasure Chest – The consistent application of core pressing and fly movements has allowed me to add a great deal of quality size and shape to my chest over the years. Even so, the overall development I had attained wasn’t up to my satisfaction until I delved deeper into the anatomy and function of the chest region.
Because I continually analyze workout technique in an effort to make dramatic improvements to my physique from contest to contest, I am often criticized for being far too much of a perfectionist. Yet, for those of you seeking to be the best you can be, I am sure you can relate. And if so, I have written this article with you in mind. sbotop
I certainly am not attempting to form some new fad formula and pawn it off as the next best thing, far from it! In fact, everything spoken of below revolves around the same tried-and true basic movements that you have used for years, doing so because they work. taruhan bola
Despite this, you may find some of the descriptions a bit challenging to grasp at times. If this is the case, I can promise you that if you take the time to understand these concepts, they will broaden your horizons with regard to chest training and take your development to levels that you have yet to imagine! https://www.americannamedaycalendar.com/

If you have grasped the basics with regard to proper form and core movements, the next step toward extreme chest development is to think outside the box, away from the traditional flat/incline/decline pressing scheme.
In my experience, maximizing chest development is contingent upon the incorporation of various uncommonly used angles when performing chest movements. Granted there are people out there with outstanding genetics and they can achieve exceptional development from simply sticking to the standard angles. However, this is not the case for many of us.
Before I personally started pressing from the angles between the standard flat and incline on a frequent basis, the fiber in the middle of the pectoral region appeared flat and under-developed.
After one or two years of making these angles a staple in my chest arsenal, the middle region of my pectorals had developed dramatically. In fact, my chest appears to have developed more in the last two years than in the last twelve combined simply due to building a greater amount of muscle in that region.

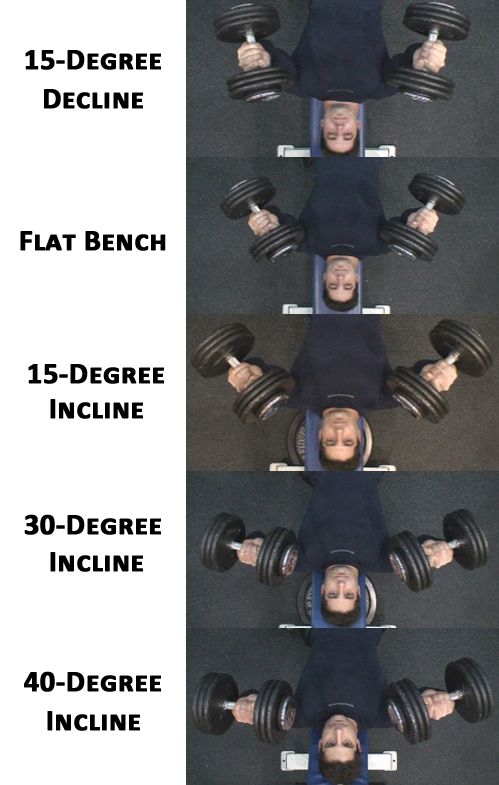
Everyone has a unique structure (such as the girth of the ribcage, variations in arm span, or muscle length), and to some extent this will dictate the most effective angles from which to press from. Despite this, I feel that the best angles range from a 30-degree decline to roughly 5-degrees above a traditional incline before the delts and triceps begin to work too hard.
I personally make use of every angle in this range in five degree increments, usually within four chest workouts. To ensure that the chest is worked thoroughly during each workout, I usually follow a general model of decline, flat, low-level incline, and a mid-level incline angles.
Though I always draw on this basic pattern, the very next workout, each of those angles will fluctuate by roughly five to ten degrees…and, yes, that means that I will occasionally leave out the traditional flat angle!
Consistently rotating your starting angle at the beginning of a workout will ensure that every area of fiber is worked when you are fresh, therefore leading to the greatest development in every region of the chest. Regardless of the angle I begin with,
I transition the fiber emphasis, either going “up the bench” or “down the bench” when pressing. I feel it is more efficient for the blood, and therefore the “pump,” to travel to neighboring areas of the chest. At the present time, my personal goals require me to begin with a mid-angle (roughly 10 to 30-degree incline) more often than the others, and of course, an exception is made with regard to this style of transitioning.
The reason that you adjust the angle of the bench to begin with is to target a specific region of chest fiber. Yet, this is a futile approach if used in conjunction with an improper pathway of travel (the direction that the arms move as you press the weight).
I find that many people simply adjust the angle from a decline to an incline and press horizontally straight across the body on each angle. If you find that your outer pec region is developing, but you can’t seem to stimulate the inner region, chances are you are making this mistake.
In addition to weak pectoral regions and over-emphasizing the front deltoids, an improper pathway of travel is a key factor contributing toward rotator cuff damage, especially while performing incline work. Therefore I find it best to provide a basic understanding of muscular fiber connections and design since consideration must be given to this when moving the weight relative to each angle.
Without delving too deep into anatomy, the upper chest region originates at the clavicle (collar bone) and the lower chest originates at the sternum and upper ribcage, with both muscles inserting into the humerus (upper arm). This forms a sort of fan-like design, with the lower chest comprising the majority of this shape.
Whenever you perform a chest movement, you will find it expedient to select a target region of fiber and consider the anatomical direction with which it travels from insertion to attachment point. If you are totally unfamiliar with the anatomy of the chest, it will do you a great deal of justice to view an anatomy chart, which is easy to find online, before trying to grasp the description that follows.
Complete stimulation from the upper to lower chest region will involve distinctive changes in the pathway of travel. Thinking in terms of fiber direction from origin to insertion, contracting the upper chest involves moving the arms with a slight upward motion. This is because the fiber runs from the collar bone into the armpit where it connects to the humerus, forming an upward angle.
Working the upper-mid region fiber of the lower chest will also entail an upward path of travel since it connects high on the sternum and angles upward, though not as sharp as the upper chest muscle. In general, the remaining lower chest fiber will run from the humerus horizontally across the sternum and gradually shift downward.
The lowest portion is angled in near-opposition to the upper chest, meaning that a sharp downward motion is needed for optimal contraction. On a side note, this concept should allow for greater flexibility with respect to cable flys, positioning the handles at various localities and contracting the fiber in the direction that it runs from origin to insertion.
Arm rotation works alongside angle selection and the pathway of travel to minimize the incorporation of the front delts and isolate a region of chest fiber. On a practical level, you can control this by paying attention to the degree to which the hands are angled throughout the ROM of chest movements. A great example of this is built right into the design of HAMMER STRENGTH chest machines.
If you have ever used them, you might have noticed that the handles are angled midway between the neutral and pronated position at the start of the press. Within this locality, it is important to note that the handle design tends to lean more toward pronation on the incline version and near the neutral position on the decline, allowing the elbows to move down slightly at the beginning of a press to minimize front-deltoid recruitment.
Additionally, as you press outward on any of these machines, the hands will slightly rotate toward the neutral position. This same isolation tactic can be used very effectively when performing dumbbell presses.
Generally speaking, I find that keeping the hands between the pronated and neutral position allows for the most natural isolation of chest fiber throughout the ROM when pressing. Again, the purpose of combining this tactic with the variables discussed previously is to achieve a more natural contraction in a select area of the chest.
Just as it is necessary to change the pressing angle and movement pathway to target a given region of fiber, you must also make relative adjustments the position of the hands. While the hands should always rotate toward the neutral position as you press upward, it is important to clarify that you should not use the biceps and forearm to deliberately rotate the hands during the movement.
They will slightly (and I mean slightly) rotate toward the neutral position due to the natural rotation of the arms as you press the weight, virtually remaining in the same position throughout the movement.
The ideal hand placement will shift slightly more toward the pronated or neutral variation depending on the angle used. To clarify, the hands will rest near pronation on incline dumbbell pressing movements and they will gradually shift toward the neutral position relative to dropping the bench angle down toward a decline.
The hands should still maintain some degree of pronation at the top of the movement for each angle until you begin to move below the flat angle. From the flat angle and below, you should find the hands to be approaching the neutral position, with a very subtle shift toward the supinated position at the top of the movement when the arms are extended on a steep decline angle.
I know this may be confusing, but if you try to grasp what I am describing here, it will be benefit you beyond belief! A sound way for you to imagine this, strictly with regard to hand placement, is to sit in your car, move the seat back, and grab your steering wheel. As you move from top to about the 4 and 8 o’clock locality, representing upper to lower chest, your hands will rotate from the pronated, to the neutral, to just slightly into the supinated position.
It is common for people to transfer the pronated grip variation from barbell presses over to dumbbells since they are accustomed to it. However, you will find that chest stimulation will be enhanced, while minimizing front delt recruitment, by adding the aforementioned twists to dumbbell movements.
The most obvious proof will come about when switching the wrists from the customary pronated to the neutral position on a flat or decline angle, as you will experience a major transfer of stress and much greater contraction in the lower pectoral region.
It is important to realize that, because you are taking out front delt fiber to enhance isolation of the chest region, you will inevitably press with lighter weights. Even so, performing in this manner will yield big time results!
Lastly, be sure to give a great deal of consideration to the pectoral minor region, which lies underneath the chest. This muscle attaches to the scapula (shoulder blade) and runs down to the upper region of the ribs. Hypertrophy of the pec minor will cause the outer region of the chest to flare out quite remarkably in time and you will find few exercises that blast this muscle better than the (single) dumbbell pullover.
The proper usage of positioning entails adjusting the body against gravity for the sole purpose of stimulating a given region of fiber. If you apply the basic form principles described in this article with an understanding of connection points and fiber direction, you will have a better grasp on which angles and motion pathways are optimal to stimulate a given area of the chest.
Though they encompass decades of extensive research, you might also realize that the human body is much too complex to limit yourself to the majority of mainstream regimens. If you seek to be the best you can be, you will have to expand your thought process with every bodypart to take your training to the next level. Doing so is a surefire way to guarantee that your physique will follow that same pattern!
…
Continue reading